
How to Measure & Calculate Materials for a DIY Pool Fence
Planning a DIY pool fence installation starts with determining the correct layout, measurements, and materials needed for your project. This guide walks you through the same step-by-step process used in our DIY Pool Fence Calculator so you can confidently measure your pool area and determine what materials you need before placing an order.
If you still need help deciding where your pool fence should go or what to consider when planning your layout, be sure to review our complete Pool Fence Layout Planning Guide before getting started.
Using This Guide vs. Using the DIY Calculator
This guide can be used to measure and calculate materials for nearly any removable mesh pool fence style we offer, including different:
- fence heights
- mesh styles
- colors
- pole types
- gate styles
Our DIY Pool Fence Calculator follows the same step-by-step process shown in this guide and automatically calculates material quantities for you.
Please note:
The current DIY Calculator is pre-configured to build material quantities using standard 4-foot or 5-foot Classic Black removable mesh pool fencing with ½-inch peg poles.
If you choose a different fence style or pole type, the overall measuring process and material calculations remain the same.
Step 1: Choose Your Pool Fence Height
When it comes to removable mesh pool fencing, there are two standard height options:
- 4-foot pool fencing
- 5-foot pool fencing
For most homeowners simply looking to add child safety and peace of mind around their pool, a 4-foot pool fence is the most popular option and is what the majority of customers choose.
However, if you are:
- working with a city or county inspector
- building a new pool
- involved in foster care or adoption requirements
- working with a safety agency or HOA
- required to meet local building codes
you may be required to install a 5-foot pool fence instead.
Because local requirements can vary, we always recommend checking with your local building department or agency if you are unsure which height is required for your project.
Both fence heights use ASTM-compliant removable mesh pool fence materials and are compatible with matching self-closing, self-latching gate options.
Step 2: Determine Your Fence Layout & Measure the Total Length
Before measuring, make sure you have already planned your pool fence layout and considered where your fence will start, stop, turn, and allow for entry access.
If you still need help planning your layout, review our Pool Fence Layout Planning Guide before continuing.
In this step, you will measure the total length of your entire fence run from start to finish. This includes:
- straight fence sections
- turns and corners
- planter areas
- grass sections
- raised areas or steps
- wall-to-wall or endpoint-to-endpoint measurements
Using a tape measure or measuring wheel, measure the complete path your pool fence will follow around the pool area.
At the end of this step, you should have the total linear footage of your project.
Example:
“My pool fence layout requires approximately 82 feet of fencing.”
This total measurement will be used in the next steps to determine:
- how many fence sections you need
- how many gates your layout requires
- whether additional materials may be needed
Step 3: Decide How Many Entry Gates You Need
Before calculating how many fence sections you need, you must first determine how many gated entry points your pool fence layout will include.
This is important because each self-closing, self-latching pool fence gate takes up approximately 3 feet of space within your overall fence run. That space will later be subtracted from your total fence length when calculating how many fence sections you need to order.
Most homeowners choose at least one gate for quick and convenient access to the pool area without needing to disconnect or remove fence sections.
When deciding how many gates you want, consider:
- main walking paths
- backyard access points
- spa access
- convenience for daily use
- how people naturally move around the yard
Some homeowners choose:
- one gate for primary access
- two gates for easier backyard flow
- additional gates for larger pool areas or multiple entry points
Pool fence gates are typically one of the more expensive components of a removable mesh pool fence system, so it is common for homeowners to balance convenience with budget.
If you prefer, you can also create manual access points between fence sections using options such as a Quick Lock Latch instead of adding additional self-closing gates.
However, for convenience and everyday usability, most homeowners choose to install at least one self-closing, self-latching gate.
If you are unsure, it is usually easier to add additional gates later than to remove one after installation.
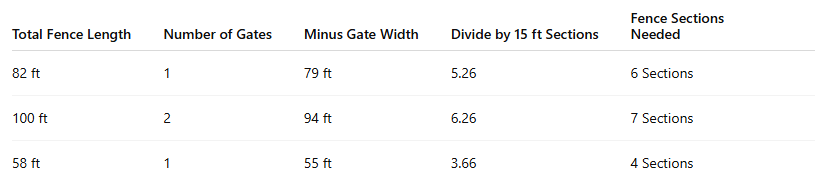
Step 4: Calculate How Many Fence Sections You Need
Now that you know:
- your total fence length
- how many entry gates your layout includes
you can calculate how many removable mesh pool fence sections you need to order.
All-Safe pool fence sections are sold in standard 15-foot pre-assembled sections with approximately 36-inch pole spacing.
Because each self-closing gate takes up approximately 3 feet of space, you will subtract the width of your gated entries from your total fence length before calculating the number of fence sections needed.
Fence Section Calculation Formula
Step 1:
Determine your total fence length.
Example:
82 feet total
Step 2:
Subtract 3 feet for each gated entry.
Example:
82 feet – 3 feet = 79 feet
Step 3:
Divide the remaining footage by 15 feet per fence section.
Example:
79 ÷ 15 = 5.26 sections
Step 4:
Always round UP to the nearest full section.
Example:
Order 6 fence sections
Fence sections can be trimmed shorter during installation for a custom fit, so it is always better to round up rather than order too little fencing.
Important Notes
- Fence sections can be cut shorter during installation for a custom fit
- Standard fence sections are approximately 15 feet long
- Gates are calculated separately and are not included within standard fence sections
- It is always better to round up than order too few sections
Step 5: Choose Your Pool Fence Gate Style
Now that you know how many entry gates your layout requires, it’s time to decide which gate style best fits your project.
All-Safe offers two standard DIY pool fence gate kit options for most 4-foot peg pole fence installations:
Both options include:
- a self-closing gate
- a self-latching design
- key-lockable safety hardware
- ASTM-compliant gate swing direction requirements
Standard DIY Gate Kit Options
Classic Rectangular Post DIY Gate Kit
This option includes separate rectangular gate posts with pre-mounted hardware and is the most traditional removable mesh pool fence gate style.
U-Safe DIY Gate Kit
The U-Safe Gate arrives pre-assembled for faster installation and includes a Peg Shifter for simplified setup.
Important Compatibility Information
The U-Safe DIY Gate Kit is only available for:
- 4-foot fencing
- ½-inch peg pole fencing
- Classic Black Combo E mesh
The standard pre-boxed DIY gate kits are also primarily designed around standard Classic Black peg pole fence configurations.
If you are ordering:
- 5-foot fencing
- 1-inch pole fencing
- custom mesh styles
- Hampton mesh styles
- Tan/Brown or Gray fence colors
- non-standard configurations
you will typically build a custom gate setup by selecting:
separately.
Need a Custom Gate Configuration?
If your pool fence uses a non-standard style or configuration, browse our:
to build a gate system that matches your fence style.
Step 6: Are You Making Turns in Your Fence Layout?
If your pool fence layout changes direction around your yard, planter areas, steps, patios, or pool features, you may need to account for turns when planning your installation materials.
Most removable mesh pool fence layouts include some type of turn, including:
- gradual turns
- 45° turns
- 90° turns
Many turns can be created using standard fence sections and normal installation techniques without requiring additional specialty parts.
However, tighter turns or layouts with sharper direction changes may benefit from:
- reinforced Corner Posts
- double-pole turn techniques
- additional installation hardware
Important:
Turns do NOT typically change the total amount of fence footage you need to order.
However, depending on your layout and preferred installation method, you may need to add additional corner or turn-related components to your cart.
Corner Posts are commonly used when homeowners want:
- a cleaner finished appearance
- stronger support at sharp turns
- easier alignment for tighter corners
Soft turns and double-pole turns are often used for more gradual layout changes using standard fence materials.
If your layout includes turns, review your layout carefully and determine whether additional corner components may be needed before placing your order.
Important Dirt Installation Note
Standard removable mesh pool fence turns are typically designed for concrete installations.
If your fence layout needs to make a turn in:
- dirt
- grass
- landscaping areas
- soil surfaces
you will typically need to use a Round Terminating Post to properly support and redirect the fence line.
Round Terminating Posts can be:
- permanently cemented into the ground
OR - installed using a Round Terminating Post Sleeve to allow the post to remain removable.
If your layout includes turns in dirt or grass areas, make sure to add the appropriate Round Terminating Post components to your cart before ordering.
Additional Resources
- How to Install a Pool Fence Corner Post
- How to Install a Round Terminating Post & Sleeve
- Review turning methods in the Pool Fence Installation Quick Guide
Step 7: Does Your Pool Fence Need to Connect to a Wall or Structure?
If your removable mesh pool fence will start or stop at:
- your house
- a wall
- a column
- an existing backyard fence
- a post or other structure
you may need additional termination components to properly secure the end of the fence.
Most pool fence layouts include at least one location where the fence run needs to securely end or attach to something other than another fence section.
There are two common ways to handle these fence termination points:
Wall Attachment Kits
Wall Attachment Kits allow you to securely anchor your removable mesh pool fence directly to:
- walls
- columns
- fences
- posts
- other solid structures
These are commonly used when the fence begins or ends against the home or another permanent structure.
Rectangular Posts
Rectangular Posts provide a freestanding fence termination option when attaching directly to a wall or structure is not ideal.
These are often used when:
- a wall attachment is not possible
- additional spacing is needed
- homeowners prefer a freestanding end point
Round Terminating Posts (with optional sleeve)
If your pool fence needs to begin or end near a wall or structure but the installation surface is dirt or grass instead of concrete, a Round Terminating Post may be required instead of a standard Rectangular Post or Wall Attachment Kit.
Round Terminating Posts allow removable mesh pool fencing to securely terminate in soil areas where standard deck-mounted components cannot be installed.
Optional Round Terminating Post Sleeves are also available if you want the post to remain removable after installation.
Important:
Wall attachments and terminating posts do NOT typically change the total amount of fence footage you need to order.
However, depending on how your layout starts and stops, you may need to add:
to your cart before placing your order.
In most cases, you will need one termination solution for each location where your fence run begins or ends.
Additional Resources
- Watch: How to Install a Pool Fence Wall Attachment Kit
- How to Install a Round Terminating Post & Sleeve
- Review Rectangular Post installations in the Pool Fence Installation Quick Guide
Step 8: Optional Tools & Installation Equipment
Before installing your removable mesh pool fence, make sure you have the proper tools and drilling equipment for your specific fence style and pole type.
Tool requirements vary depending on whether you are installing:
- ½-inch peg pole fencing
OR - 1-inch pole fencing
Peg Pole Fence Installation Tools
Peg pole installations require drilled anchor holes and are commonly installed using a hammer drill system.
Required Tools
- Tape Measure
- China Marker / Grease Pencil
- Chalk Line
- #2 Phillips for Classic Paint fence
- #2 Square Drive for Ultra Paint fence
- Torpedo Level
- Safety Glasses
- Ear Protection
- Box Cutter
- Pliers
Required Drilling Tools
- Hammer Drill with SDS Chuck
- 5/8″ x 18″ Hammer Drill Bit
- Drill Guide
1-Inch Pole Fence Installation Tools
1-inch pole fencing uses larger core-drilled holes and requires different drilling equipment.
Required Tools
- Tape Measure
- China Marker / Grease Pencil
- Chalk Line
- #2 Phillips for Classic Paint fence
- #2 Square Drive for Ultra Paint fence
- Torpedo Level
- Safety Glasses
- Ear Protection
- Box Cutter
- Pliers
Required Drilling Tools
- Wet Core Drill
- 1-1/8″ Core Bit for Y-Beam Pole
- 1-1/4″ Core Bit for Twin-I Beam Pole
Hammer Drill Guides
Hammer Drill Guides are designed specifically for ½-inch peg pole installations and help improve drilling accuracy and alignment.
Many DIY homeowners choose to use a Drill Guide because it:
- improves drilling accuracy
- helps create straighter fence lines
- reduces installation mistakes
- improves overall fence appearance
While optional, Drill Guides are highly recommended for first-time peg pole DIY installations.
Important:
Most installation tools and drilling equipment are not included with your pool fence purchase and may need to be purchased or rented separately before installation.
Additional Resources
Step 9: Finalize Your DIY Pool Fence Materials
At this point, you should now have:
- your total fence length
- gate quantities
- turn requirements
- wall connection details
- any additional corner or termination components
- your installation tool requirements
Before placing your order, carefully review your project layout and confirm that you have accounted for all required materials and accessories.
Common Materials to Review
- Fence Sections
- Gate Kits or Gate Components
- Corner Posts
- Round Terminating Posts
- Wall Attachment Kits
- Rectangular Posts
- Sleeves or Anchors
- Installation Accessories
Step 10: Place Your Order
Once your measurements and material list are complete:
- Add your selected materials to your cart
- Review quantities carefully
- Confirm fence styles, colors, and pole types
- Review shipping options and delivery timing
You can now shop all DIY removable mesh pool fence products here:
Shop Online