How Can We Help?

Search for answers or browse our knowledge base.

Print

Creating a Finished Edge for Your Pool Fence Mesh

If you’re trimming a mesh panel for a custom pool fence layout or creating a shorter fence panel, it’s important to finish the cut edge to prevent fraying and ensure the section looks and functions like the rest of your fence.

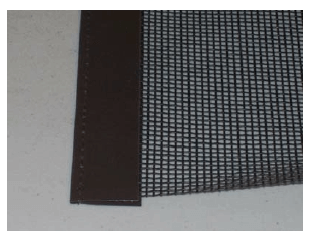
This guide walks you through one of the most popular and secure methods using Border Trim and 
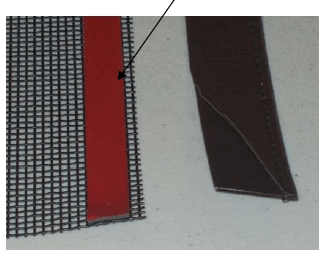
Pool Fence Border Tape

Note: There are several ways to achieve a clean, finished edge on cut mesh. This is just one recommended approach. We’ll be covering additional methods in future articles—check back soon or explore our Knowledge Base for updates.

What You’ll Need:

Steps to Create a Finished Edge:

1. Gather Your Materials

Make sure you have all the necessary items ready: Border Tape, Border Trim, scissors, and the material you are installing.

2. Apply Border Tape

Place the sticky side of the Border Tape along the edge of the cut mesh. Align it carefully for even placement.

Step-by-step guide to finishing a cut edge on fencing material using Border Tape and Border with 1 Thread for a professional, durable look.

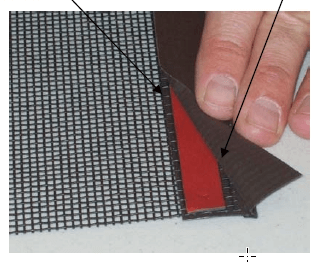
3. Attach the Border Trim

Fold the Border Trim over the mesh so that one thread of the mesh is covered, ensuring both sides of the cut edge are enclosed within the trim.

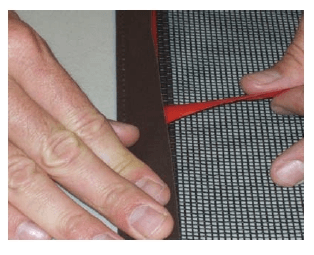
4. Secure the Tape Gradually

Peel back about 4–6 inches of the red tape liner at a time. Avoid pulling too much at once—Border Tape is highly adhesive and bonds immediately.
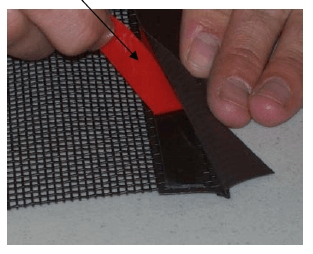
5. Smooth and Press

As you continue peeling the red liner, run your fingers along the trim to press the mesh securely into the tape. This helps avoid bubbles and ensures an even seal.

6. Finalize the Edge

Your cut panel now has a clean, finished edge. Complete the installation by reattaching the molding strip on top of the pole with screws. This method can be used for any fence installation requiring a cut!

By following these steps, you can achieve a professional and durable finish on your fence installations.

Was this article helpful?
0 out of 5 stars
5 Stars 0%
4 Stars 0%
3 Stars 0%
2 Stars 0%
1 Stars 0%
5
Please Share Your Feedback
How Can We Improve This Article?
Table of Contents

Get Started!

Enter in your zip code to let us know where your pool is located.

Color Variations

Colors on your screen or brochure may not match the actual color of your product.

Due to the many variations in monitors, phones, and browsers, color samples and product examples may appear different on different screens. Computers and mobile devices are not all calibrated equally and color reproduction on the Internet is not precise. The same is true for printed items such as brochures and other sales literature. 

In addition, the colors of our products photograph differently under different lighting conditions. For example, photos taken in full sunlight will vary from photos taken on a cloudy or overcast day. Similarly, shadows from nearby objects can affect the color and transparency of our products. If a precise color or specific shade is important, please inspect the actual color of your product prior to installation.

Colors will vary from batch to batch.

Many of our products’ materials are not available through typical stores and vendors and therefore must be custom manufactured specifically for our use. In order to control costs and provide you with the best value possible, our raw materials are produced in large batches and can often take several months to receive. The colors of our materials can, and often do, vary slightly from batch to batch. Although we make every effort to minimize color variations, we cannot be responsible for these differences when they occur. If a precise color or specific shade is important, please inspect the actual color of your product prior to installation.

Color names are subjective and may not be what you think the color should be.

For example, we use the name “putty” to describe some of our products. Your idea of the color “putty” may be different than someone else’s idea of “putty”. In addition, products may have the same color name but may not be the exact same color. For example, we have different shades of “black”. Please do not order using color names as your only guide. If a precise color or specific shade is important, please inspect the actual color of your product prior to installation.

Inspect the actual color of your product prior to installation.

If it is important that your product be an exact color or shade, it is highly recommended that you inspect the actual product prior to its installation and address any concerns with your local independent installer. Most independent installers do not offer refunds or accept returns due to color variations.