
Building Your Own Pool Fence Gate with Rectangular Posts
Bought the boxed DIY Self-Closing Gate Kit? You want Installing Your DIY Self-Closing Gate Kit instead — yours arrives with the hinges and latch brackets already fitted, so several steps below do not apply to you.
Putting in a whole new fence? Start with the Pool Fence Installation Quick Guide. Your gate is what sets out the rest of the fence, so it’s one job, not two.
This page is for a gate built from parts: a gate frame, two rectangular gate posts, and a latch and hinge kit, bought separately so you can match a fence you already have or choose your own color, mesh and hardware.
Using Double Round or Double Square posts? Those set differently — four holes rather than two. See Building Your Own Pool Fence Gate with Double Round or Double Square Posts.
Watch the install
What you need
Your gate frame, two rectangular gate posts, and a latch and hinge kit. The posts come with their flange, bracket kit, cap, sleeve and screws. The latch and hinge kit brings its hinges, the latch, and the screws for both.
Using the D&D Technologies kit instead? Build the gate exactly the same way, then follow How to Install a D&D MagnaLatch Series 3 Top Pull for the latch and hinges.
Tools
- Hammer drill with a ⅝-inch bit for the deck holes — the same as the rest of your fence
- Cordless drill with a #2 Phillips bit and a bit extender
- A 5/32-inch bit for pilot holes
- A Phillips screwdriver
Before you start
- You need a concrete deck or other hard surface. In grass or dirt, pour a concrete gate pad first, or use the U-Safe Gate Kit, which is made for footings.
- Decide which way the gate opens before you drill. Nothing is pre-drilled, so you choose which side the hinges go on and the gate can swing left or right. Hang it so it swings out, away from the pool — that’s how our installers do it and it keeps your installation in line with ASTM.
- Your fence goes in first, with the gate post holes drilled as shown in the installation quick guide.
Step by step
- Fit the flanges and unpack the latch kit. Attach a gate flange to the bottom of each rectangular post with the 5/8-inch section screws from the package, using a #2 Phillips drive with a bit extender. Unpack the TriLatch kit and set the one long black screw aside — you need it at the very end. The weep holes mark the bottom of the gate frame.
- Set the posts. Drop the posts into their deck holes and set the neighboring fence poles beside them. Before you go on: both ends of the fence are anchored, every section is connected, and the gate posts and every pole are fully seated.
- Connect the gate posts to your fence. Remove the top screw from the fence pole next to each gate post. Zip-tie the top of the gate post and the fence pole together and tighten until they are about 2½ inches apart on center — the zip tie just holds things lined up so the bracket drills on straight. Screw the eye into the pole. Hold the rectangular bracket level and drill through its center hole into the post with the 5/32-inch bit, then attach it with the black screws. Turn the eye horizontal, attach the quick link and screw it closed. Repeat on the other gate post.
- Mark and mount the hinges. Decide which way the gate opens — it always swings out, away from the pool. Measuring from the top of the frame, mark 7 and 8½ inches. From the bottom (the end with the weep holes), mark 10½ and 12 inches. Pre-drill those marks with the 5/32-inch bit, just off the molding’s center line on the mesh side, using a sharp bit and starting slowly so it doesn’t slip into the mesh. Only the front holes for now — two per hinge. If a molding screw sits near the bottom hinge, remove it so the hinge sits flat, then screw the hinges on.
- Hang the gate and mount the latch brackets. Line the top of the gate frame up with the top border of the fence mesh. Push the hinge down so it sits flush on the front and side of the rectangular post, pre-drill the top hole and screw it in. Do the same for the bottom hinge, then the second hole of the top hinge. Hold the gate open and pre-drill and screw all eight holes on the inside of the hinges. Slide the latch mounting brackets off the latch, set one just under the rectangular bracket flush with the side of the post, and pre-drill and screw it in, including the lower and side holes.
- Install the TriLatch. Slide the latch body onto the top bracket and down until the top of the pull knob is at 54 inches. Slide the bottom bracket into the latch body without moving it, pre-drill the side hole and screw it in. Slide the latch body off, pre-drill the remaining two holes, screw in the top one and leave the bottom one empty. For the striker bracket, line up the raised indicator lines on the bracket and the latch body, pre-drill and screw the two front holes, then the two side holes. Slide the striker body onto its bracket and turn the silver screw clockwise until the two are flush. Slide the latch body back on, secure it with the long black screw you set aside, and cover the hole with the cap from the kit.
- Adjust and check. Turning the silver screw in the middle of the striker clockwise moves it left; counter-clockwise moves it right. It’s right when the spacing is even and the gate closes and latches on its own from any position. You’ll re-adjust it from time to time over the life of the fence.
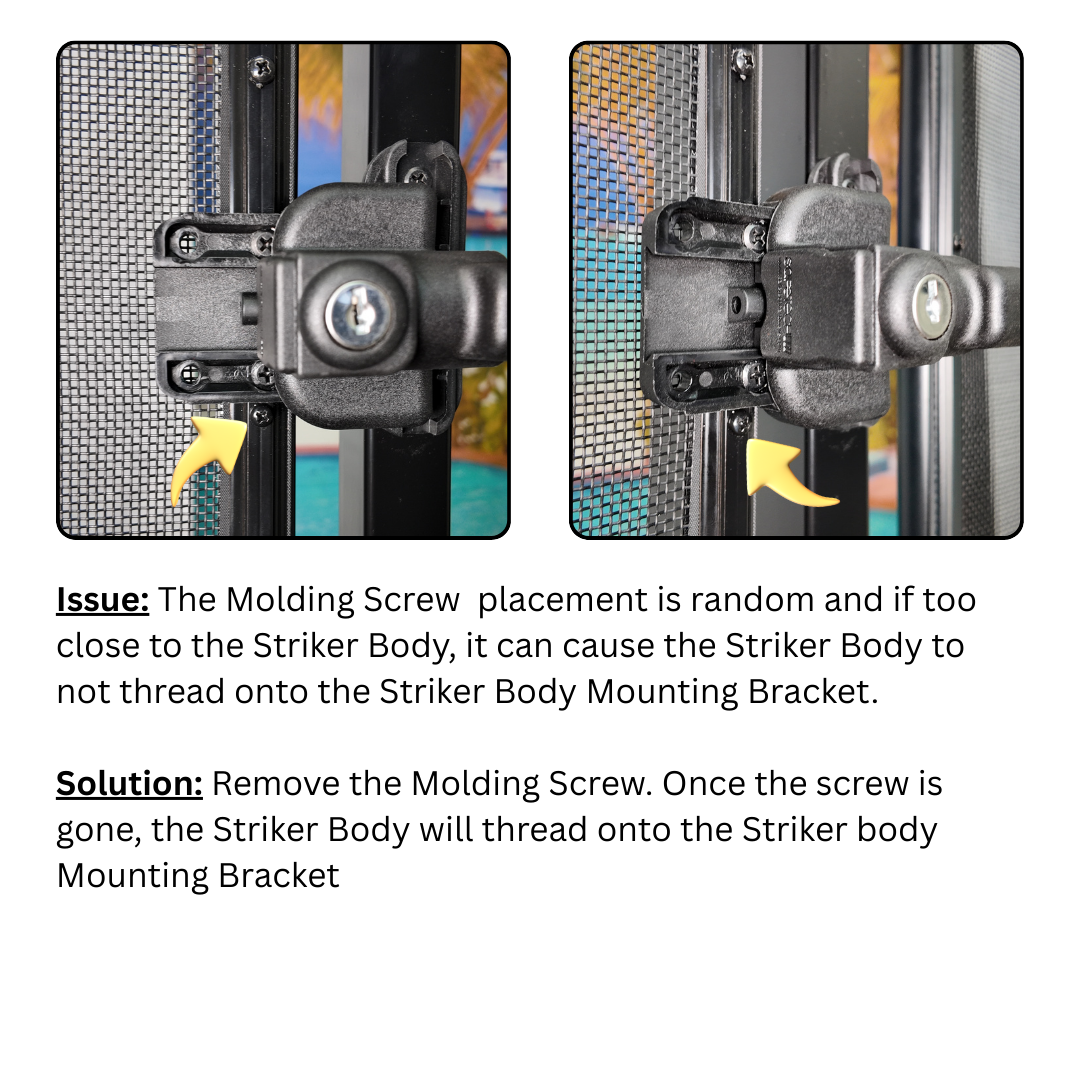
If Molding Screw is in the way of the TriLatch Striker Body:
Still not latching?
See TriLatch Gate Latch: How to Adjust and Troubleshoot. A small turn of the adjustment screw is usually all it takes, and it’s worth re-checking every few months.
Looking for pool fence drilling and installation details?
See our guide to hammer drilling for peg pole fencing.