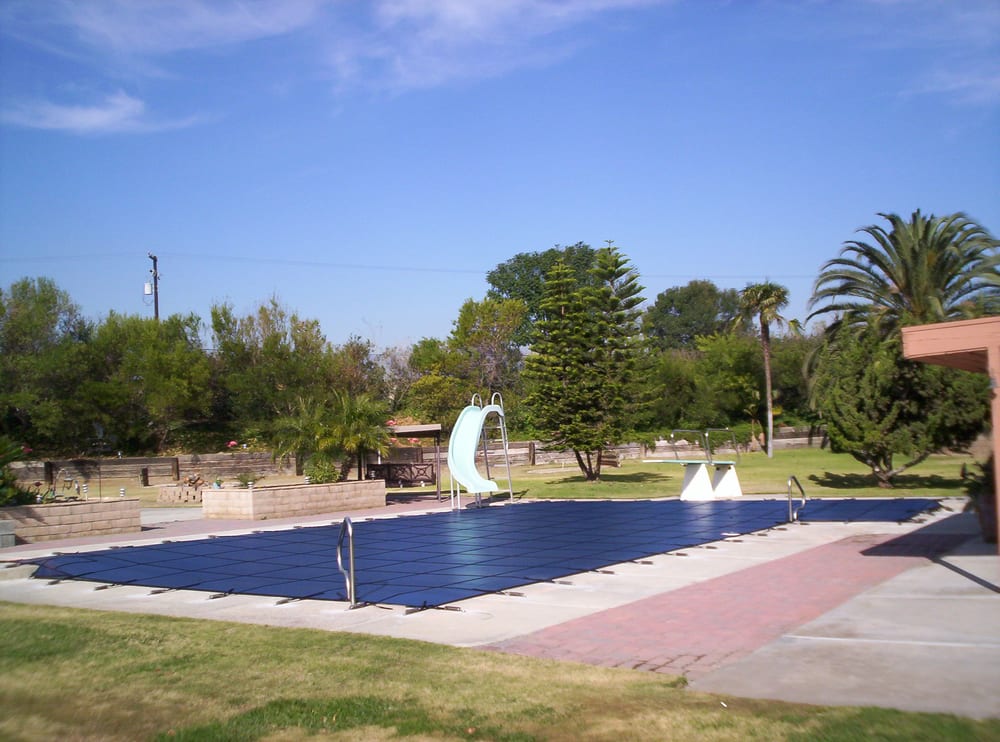
Spring is coming, and that means it will soon be time to remove your winter pool cover. Winter pool covers help you keep your pool area safer when temperatures drop while also protecting your swimming pool from damage caused by freezing temperatures. Knowing how to open your pool up again in the spring and begin the process of getting it ready for use starts with safely removing the winter cover in favor of mesh pool covers or swimming pool safety nets. Doing the job right not only helps reduce the risk of unsupervised pool access that can lead to accidental drownings but also lets you keep your cover from being damaged while not in use.
Keeping Pool Safety a Year-Round Priority
Thousands of lives are lost annually to accidental drownings, and tens of thousands of victims seek medical attention for drowning injuries. These risks are only heightened over the winter months as freezing temperatures chill the water, adding the risk of hypothermia to the equation. Swimming pool barriers save lives by keeping children, pets, and at-risk adults out of the pool area and out of the water without competent supervision. Never leave your pool unattended while you remove your winter pool cover unless another safety barrier–either a removable mesh pool fence, swimming pool safety cover, or pool safety net–is in place and secured.
Preparing to Remove the Winter Pool Cover
Before you begin the removal process, take advantage of your winter pool cover being installed and stretched tight to do your preparations.
Remove Leaves, Debris, and Dirt – The last thing you want when opening your pool is to contaminate the water with leftover detritus from winter. Use a soft-bristled broom to sweep off the pool cover, collecting the debris for disposal.
Pump Off Standing Water – Use a siphon or pool cover pump to remove water trapped on top of your winter cover before it can enter your swimming pool.
Inspect Your Pool Cover For Damage – Now is the time to closely examine your winter pool cover before you remove it. Look for rips, tears, or signs of weathering on the cover itself and along each strap. If you see potential damage away from the pool edge, take note of it and inspect it as you remove the cover or once it’s removed. Never step out onto a winter pool cover you believe may be damaged.
Safely Removing Your Winter Pool Cover
The prep work is done, so now it’s time to remove the winter pool cover. Set aside the time to do the job properly, and make sure you have either a mesh swimming pool safety cover or pool safety net ready to go onto your pool before you leave it unattended or that your swimming pool safety fence is in place and secure.
Bring a Friend – Removing a winter pool cover can be done by a single individual, but it’s best to have at least two sets of hands. Winter pool covers are large and heavy, and two people can get the job done more efficiently than one.
Remove the Anchors – Don’t remove all the anchors at once! That’s how you end up fishing the cover out of the bottom of the pool. Instead, start by removing the anchors from each end, then the first couple sets of anchors from each side. Walk the cover toward the still-secured end of the pool, folding it. Remove anchors in pairs until you have folded the winter pool cover neatly in half.
Continue Folding the Cover and Removing Anchors – Once the cover is folded in half, fold it in half again. Continue the process until the final anchors can be removed and the cover pulled aside and away from the swimming pool without damaging it.
Open Your Cover for Cleaning – Unfold the cover in a smooth, flat area without any obstacles that could puncture it. Clean the cover with a light detergent and water, brushing it with a soft-bristled brush to remove dirt. Now is also a great time to look closely at any damage you noticed while it was installed.
Air Dry the Cover – Once you remove the winter pool cover and clean it, you need to dry it in preparation for storage. The cover needs to be completely dry, so allow plenty of time. This can give you the opportunity to get started on cleaning, sanitizing, and refilling your swimming pool to begin the pool opening process. Once you finish with the pool for the day, install your safety net or cover and secure your pool fence.
Fold the Cover for Storage – Sprinkle some baking soda onto the dry cover to help prevent mold and mildew, then fold your cover, halving it repeatedly until it can be rolled up for storage in a bag, barrel, or rugged trash can. If using a bag, find a place to suspend it above the floor to make it harder for pests to damage it.
If Your Winter Pool Cover is Damaged, Fix It During Warmer Months
If you notice any damage as you remove your winter pool cover, we carry a full line of pool cover parts so you can make sure it’s ready for the next season. For repairs that are beyond your comfort level, our local independent installers are your go-to source for pool safety advice. They can help with repairs, replacement, or with adding the alarms and accessories your pool area needs for even more protection.
Remove Your Winter Pool Cover and Prepare for Safe Summer Fun
The swimming season is right around the corner, and we want to ensure you’re ready for it. Schedule your free pool safety inspection with a local professional now. Keep your pool safe with All-Safe Pool this summer.
When your backyard is used for playtime, parties, and pets, pool safety gets more complicated. Learn how to create a safer multi-use backyard with the right pool fence layout, smart traffic flow, and layered safety features.
Building a new pool or planning a major backyard remodel is the best time to think through pool fence placement. Learn how to plan your fence early so your design stays safe, code-conscious, and easy to use for your family.
Listing your home or guest house with a pool can boost bookings, but it also raises your responsibility. Learn how short‑term rental hosts can use pool fences, clear rules, and simple routines to keep guests safer and reduce risk.