10 Questions to Ask Before Buying a Pool Safety Fence
Don’t buy a pool safety fence without asking these essential questions. This buyer’s guide helps you evaluate height, compliance, materials, installation, and more.

A removable, mesh safety fence may be the single most important feature that will help deter your children and pets from falling into your swimming pool while you’re not watching. These are exceedingly important and effective safety barriers. Here are a few critical tips on their installation.
We recommend contacting your local reseller as the first step to installing a new pool fence. They will schedule a free, onsite estimate to find the best solution and price for your pool’s specific needs. Cost for a pool fence can vary depending on the size of the pool, the height of the fence, gates, and the type of surface the fence will be installed on. Your local reseller will review this information with you prior to moving forward.
On the day of your pool fence installation, your local team will meet with you to review the scope of the project before any work begins. Once the plan has your approval, the installation process will begin.
The pool safety fence installation process will start with drilling at the designated points in your pool deck. Your new pool safety fence will be anchored into these points. Each anchoring point is typically placed every 36 inches to ensure optimal durability but may differ slightly based on the layout best-suited for your pool area.
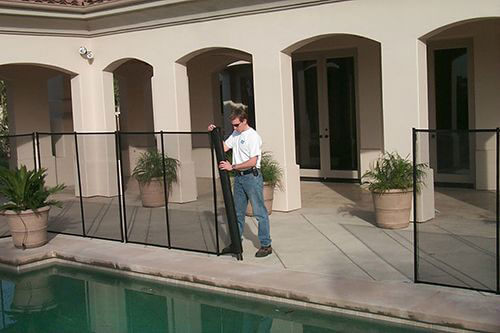
Next, plastic sleeves are inserted into the holes to make sure each post installed fits properly. Your local technician will then install the pool safety fence, along with the gate, according to the plan. Once everything is finished, your All-Safe technician will demonstrate how to take down and put up your new fence.
The whole installation process typically takes a few hours. However, some installation times may differ depending on the shape and scope of your pool. Very large pools or complex shapes extend the installation process to a second day on rare occasions.
Once your local technician explains how to take down your pool fence, it should only take you a few minutes or so for every 15 feet of safety fencing. The exact takedown time will depend on your pool’s size.
Setting up your pool safety fence is a relatively simple task. Most of our customers spend about 3-5 minutes on average per fifteen feet of fencing. Right after installation, your local technician will show you the most efficient way to set up and take down your safety fence.
When you install a pool safety fence the right way the first time, you get the best long-term results. But the process is not as easy as we make it look. Proper installation demands tested methods, expert tools, and installation experience for optimal results.
Common mistakes made during DIY pool safety fence installation could damage your pool deck or jeopardize the durability and safety of your fence. Those mistakes can cost thousands of dollars to fix. Therefore, we do not recommend DIY installation.
All-Safe has been helping homeowners keep their children and pets safe around their pools for over 25 years. Call your local reseller and schedule a free on-site installation and estimate. We’ll work with you to plan and install the ideal pool safety fence for your property.
After more than 25 years of running, our technicians work every day to perfect our installation process. As a customer of ours, you get to choose from among our swimming pool safety fences collection and add the ideal piece to your family’s backyard swimming area. No matter your pool safety problem, All-Safe has the perfect solution for you. Call your local All-Safe reseller today to get a free onsite estimate and learn how we can help you keep your pool safe for your family.

Don’t buy a pool safety fence without asking these essential questions. This buyer’s guide helps you evaluate height, compliance, materials, installation, and more.

Understand how local pool fence codes work and what to check before installation. This beginner’s guide simplifies requirements so your safety barrier complies and protects effectively.

Learn the truth behind common pool safety myths and make better decisions to protect your family with fact‑based guidance on fences, barriers, and maintenance.
Enter your zip code to locate an independent installer in your area
Enter your zip code to locate an independent installer in your area

Due to the many variations in monitors, phones, and browsers, color samples and product examples may appear different on different screens. Computers and mobile devices are not all calibrated equally and color reproduction on the Internet is not precise. The same is true for printed items such as brochures and other sales literature.
In addition, the colors of our products photograph differently under different lighting conditions. For example, photos taken in full sunlight will vary from photos taken on a cloudy or overcast day. Similarly, shadows from nearby objects can affect the color and transparency of our products. If a precise color or specific shade is important, please inspect the actual color of your product prior to installation.
Many of our products’ materials are not available through typical stores and vendors and therefore must be custom manufactured specifically for our use. In order to control costs and provide you with the best value possible, our raw materials are produced in large batches and can often take several months to receive. The colors of our materials can, and often do, vary slightly from batch to batch. Although we make every effort to minimize color variations, we cannot be responsible for these differences when they occur. If a precise color or specific shade is important, please inspect the actual color of your product prior to installation.
For example, we use the name “putty” to describe some of our products. Your idea of the color “putty” may be different than someone else’s idea of “putty”. In addition, products may have the same color name but may not be the exact same color. For example, we have different shades of “black”. Please do not order using color names as your only guide. If a precise color or specific shade is important, please inspect the actual color of your product prior to installation.
If it is important that your product be an exact color or shade, it is highly recommended that you inspect the actual product prior to its installation and address any concerns with your local independent installer. Most independent installers do not offer refunds or accept returns due to color variations.